There’s nothing more frustrating than a DIY repair that ends up looking worse than the original problem. A lumpy, mismatched patch can be a constant eyesore, reminding you that a simple project went wrong. When it comes to concrete, the difference between a professional-looking finish and a clumsy mess is all in the details. Rushing the prep work or using the wrong kind of filler can ruin your efforts. This guide is your roadmap to avoiding those common pitfalls. We’ll provide the pro tips and step-by-step instructions you need to learn how to repair cracked driveway concrete the right way, the first time.
Key Takeaways
- Prep Work Determines Your Success: A lasting repair is all about the prep. Take the time to completely clean the crack, select the right filler for the job, and use a backer rod for any deep gaps to ensure a strong, durable fix.
- Assess the Damage Before You DIY: While small cracks are a manageable project, wide or uneven cracks are red flags. If one side of the crack is higher than the other, it points to a deeper problem with the soil or foundation that requires a professional evaluation.
- Finish Strong and Prevent Future Cracks: A good repair looks invisible, so smooth your filler and blend the texture for a professional finish. After it cures, protect your entire driveway with a quality sealer every few years to prevent water damage and stop new cracks before they start.
What’s Causing Your Driveway to Crack?
Finding a new crack in your driveway is always a little disheartening. But before you can figure out the right fix, it helps to know what you’re up against. Driveway cracks don’t just appear out of nowhere; they’re usually a sign of a deeper issue. Most of the time, the problem isn’t the concrete itself, but what’s happening underneath it or around it.
The main culprits are almost always related to shifting ground, a weak base, intense weather, or just the stress of daily use. Understanding which of these is affecting your driveway is the key to a repair that actually lasts. While many small cracks are a simple DIY fix, some can signal bigger structural problems. Knowing the cause will help you decide whether to grab your tools or call in a pro for concrete repair.
Shifting Soil and Settling
The ground beneath your driveway is its true foundation. Here in the Dallas area, we have a lot of expansive clay soil, which acts like a sponge. It swells up with moisture when it rains and shrinks dramatically during our dry, hot summers. This constant movement puts a huge amount of stress on the rigid concrete slab sitting on top, leading to cracks and uneven settling. The problem is often worse if the original construction involved cheap fill dirt or if the ground wasn’t properly compacted before the concrete was poured. These unstable spots can cause sections of the driveway to sink over time, creating significant cracks and trip hazards. This same soil movement is also a primary cause of home foundation repair issues.
A Weak Foundation Underneath
Even with stable soil, a driveway is only as strong as the base it’s built on. A proper driveway installation includes a layer of compacted gravel directly underneath the concrete. This base layer is designed to provide a stable cushion that distributes weight evenly. If this step was rushed or skipped, the concrete slab lacks the support it needs. As a result, it can easily crack under pressure. Another factor is the lack of control joints. These are the straight lines you see cut into large sections of concrete. They are intentionally placed to encourage the concrete to crack in a predictable, straight line as it naturally settles. Without enough control joints, the stress builds up until the slab cracks randomly wherever it’s weakest.
Dallas Weather: From Heat to Cold
Our Texas weather plays a big role in the health of your driveway. The intense summer heat causes concrete to expand, while cooler temperatures make it contract. This constant cycle of expansion and contraction creates stress that can form new cracks or make existing ones worse. Water is another enemy. Rainwater seeps into tiny hairline cracks, and if a sudden freeze hits, that trapped water turns to ice. As water freezes, it expands with incredible force, widening the crack from the inside out. This freeze-thaw cycle can quickly turn a small, insignificant crack into a major problem, which is a common issue for homeowners throughout our service area.
Everyday Wear from Heavy Loads
Your driveway is designed to handle vehicles, but it has its limits. The sheer weight of a car or truck, parked in the same spot day after day, puts a lot of focused pressure on the slab. Over time, this repeated stress can lead to fatigue cracks. The edges of your driveway are especially vulnerable, as they have less support. Driving over the edges or parking too close to them can cause them to chip and crack. Even occasional heavy loads, like a moving van or a delivery truck for a renovation project, can place more strain on the concrete than it was designed to handle, resulting in immediate damage. You can see examples of how we restore driveways to handle this stress in our work gallery.
Gather Your Tools and Materials
Alright, before you tackle those driveway cracks, you need to get your supplies in order. Having everything on hand makes the process much smoother. The most important decision is choosing the right filler for the crack size. Let’s get you set up with the right materials and a simple checklist of the tools you’ll need.
Choose the Right Filler for the Crack Size
Walking down the concrete aisle can be overwhelming, but it’s simple: match the product to the crack size. Using the wrong filler means the repair won’t last. Let’s break down what you need for small, medium, and large cracks to ensure your fix protects your driveway.
For Small Cracks (Up to ¼-inch)
For hairline cracks up to a quarter-inch wide, a flexible concrete crack filler in a caulk tube is perfect. This quick fix improves your driveway’s look and stops water and weeds from getting in, which prevents the crack from growing.
For Medium Cracks (Up to ½-inch)
For cracks up to a half-inch wide, use a sand-based concrete patch with more body. If the crack is also deep (over a half-inch), press a foam backer rod into it first. This provides a base so you don’t waste filler.
For Large Cracks (Over ½-inch)
Cracks wider than a half-inch often point to a bigger issue. The best fix involves cutting out the damaged section and pouring new concrete. Because this is a complex job, it’s often best to get a professional opinion on your concrete repair options.
When to Use a Backer Rod
So, what is this backer rod? It’s a flexible foam rope you press into a deep crack before adding filler. Use one if your crack is deeper than a half-inch. It acts as a false bottom, saving you from wasting sealant and ensuring your repair creates a strong, durable seal at the correct depth. It’s a simple step that makes a huge difference.
Your Essential Tool Checklist
You’re almost ready! Do a quick inventory to make sure you have these items. It will make your workflow seamless. If gathering tools feels like a project, remember you can always contact us for a free estimate.
- Wire brush or screwdriver: To clean out debris.
- Pressure washer: For a deep clean.
- Leaf blower or shop vac: To dry the area.
- Putty knife or trowel: For smoothing the filler.
Your Step-by-Step Guide to Repairing Driveway Cracks
Okay, you’ve assessed the damage, gathered your supplies, and you’re ready to get to work. I love that can-do spirit! Fixing small driveway cracks is a totally manageable weekend project, and there’s a special kind of satisfaction that comes from doing it yourself. Following these steps carefully will not only make your driveway look better but will also help prevent those small cracks from turning into big, expensive problems. The key to a lasting repair is all in the prep work. It might seem tedious to spend so much time cleaning a crack you’re just going to fill, but trust me, it’s the most important part. A clean, dry surface ensures your filler will bond properly and hold up for years. We’ll walk through everything from cleaning and filling to getting that smooth, professional-looking finish. Keep in mind, this guide is for common surface cracks. If you see cracks that are very wide (more than an inch), uneven (one side is higher than the other), or seem connected to issues inside your garage or home, it could be a sign of a deeper problem with the soil or your home’s foundation. In those cases, it’s always best to get a professional opinion before starting a DIY foundation repair. But for the everyday cracks, let’s get them fixed.
Step 1: Clean Out the Crack
First things first, we need to get that crack completely clean. Any dirt, debris, or old, crumbling concrete left inside will prevent your new filler from sticking. Grab your safety glasses, seriously, don’t skip this, and use a hammer and chisel to gently chip away any loose pieces from the edges of the crack. You want to create a solid base for the repair. Next, use a wire brush to scrub out any stubborn dirt, weeds, or old sealant. Once you’ve loosened everything up, use a shop vac or a leaf blower to clear out all the fine dust and debris. If you have a pressure washer, that works great too, but you’ll have to wait for the crack to dry completely afterward.
Step 2: Prep the Edges and Dry
With the crack cleared of debris, the next crucial step is making sure it’s bone dry. Moisture is the enemy of a good concrete repair; it can prevent the filler from adhering correctly and cause the patch to fail prematurely. If you used a pressure washer or hose to clean the crack, you’ll need to give it plenty of time to dry in the sun. To speed things up, you can use a leaf blower or shop vac to force air into the crack and remove any lingering moisture. Even if you didn’t use water, it’s a good idea to blow out any fine dust that may have settled. A clean and completely dry surface gives your filler the best possible chance to create a strong, lasting bond.
Step 3: Insert a Backer Rod (If Needed)
If you’re dealing with a crack that’s more than a half-inch deep or wide, you’ll want to use a foam backer rod. Think of it as a space-filler. Trying to fill a deep crack entirely with expensive caulk or patching compound is wasteful and can lead to a weak repair because the filler won’t cure properly. The backer rod, which is essentially a flexible foam tube, solves this. Simply press the rod down into the crack with your fingers or a putty knife. You want it to sit about a quarter-inch to a half-inch below the driveway surface. This creates a solid base and leaves the perfect amount of space for the filler to sit on top and do its job effectively.
Step 4: Apply Your Filler
Now for the main event: filling the crack. Take the concrete filler or caulk you chose and prepare it according to the package directions. For caulk tubes, you’ll snip the end of the nozzle at an angle. Slowly guide the tip along the crack, applying steady pressure to lay a consistent bead of filler. Make sure you force the material deep into the crack to eliminate any air pockets. It’s better to slightly overfill the crack, as some products will shrink a bit as they begin to cure. This step is the core of any concrete repair, so take your time to ensure the crack is filled completely from end to end for a solid, durable fix.
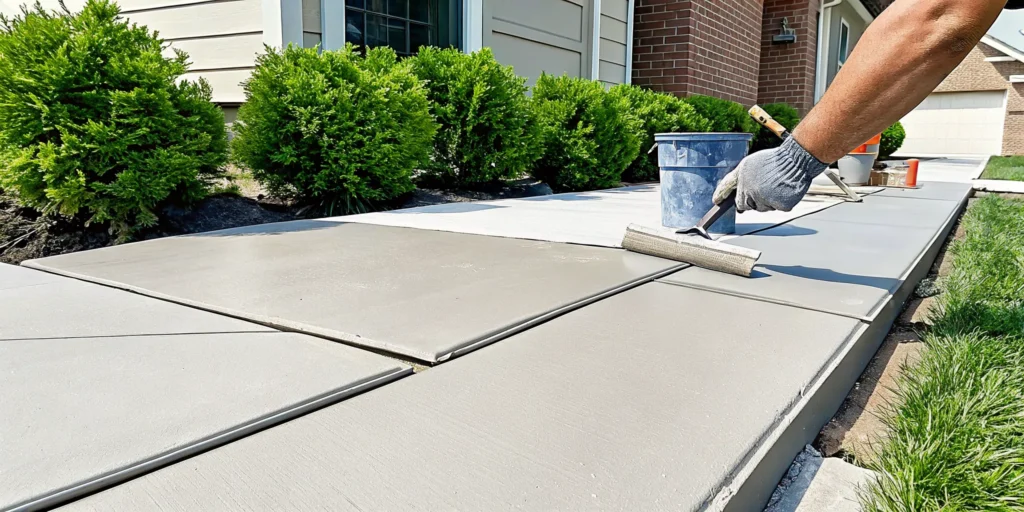
Step 5: Smooth the Surface
Once the crack is filled, it’s time to create that smooth, seamless finish. Grab your putty knife or a small trowel and press it firmly onto the surface at a slight angle. Drag the tool along the length of the repair to smooth out the filler and remove any excess. You want the repaired area to be perfectly level with the surrounding driveway. For a really clean look, you can try to “feather” the edges, which just means using light pressure to blend the very edges of the filler into the existing concrete. This simple step makes a huge difference in the final appearance and helps the repair look less obvious.
Step 6: Let It Cure
This step requires a little patience, but it’s absolutely essential. Your repair isn’t just drying; it’s curing, which is a chemical process where the filler hardens and gains its full strength. Check the product’s instructions for the recommended cure time. It could be anywhere from a few hours to a full day or more, depending on the product, temperature, and humidity. Resist the temptation to walk on it, drive over it, or even touch it to see if it’s hard. A premature disturbance can ruin all your hard work. It’s a good idea to block off the area with cones or caution tape, especially if you have kids or pets running around.
Step 7: Seal Your Repair
You did it! The crack is filled and cured. The final step to protect your hard work and the rest of your driveway is to apply a sealer. After the patch has had plenty of time to cure completely (check the filler’s instructions, but waiting a week is a safe bet), it’s time to seal it. A good quality concrete or masonry sealer will protect the patch and the surrounding concrete from water penetration, UV damage, and oil stains. This simple act of maintenance helps prevent moisture from seeping in and creating new cracks, extending the life of your driveway and keeping it looking its best. It’s a great way to protect your investment and avoid future concrete repair jobs.
Get a Professional-Looking Finish
You’ve done the hard work of cleaning and filling the cracks, but the job isn’t over yet. The final touches are what separate a noticeable, clumsy patch from a seamless, professional-looking repair. The goal is to make your work blend in so well that no one can tell there was ever a crack there in the first place. These finishing techniques will help you achieve a smooth, uniform look that restores your driveway’s appearance and curb appeal.
Match the Concrete Color
One of the biggest giveaways of a DIY repair is a mismatched color. Concrete isn’t just gray; it comes in many shades that change as they age and weather. To get a clean look, you need to “pick the right kind of sealant for the job.” Many repair products come in different tints, so read the labels carefully to find the best match for your driveway. If you’re unsure, it’s always a good idea to test the product on a small, out-of-the-way spot first to see how it dries. This simple check can save you from having a repair that sticks out like a sore thumb.
Blend the Texture with Sand
Beyond color, the texture of your repair is key to making it disappear. Your existing driveway likely has a slightly gritty, sandy surface. A perfectly smooth patch will stand out against this texture. A great trick for helping your repairs blend in is “mixing sand with the repairs.” You can either mix a small amount of sand directly into your filler before applying it or sprinkle a light layer of sand over the top of the wet filler. Gently press the sand into the surface with your trowel to create a more uniform, natural-looking texture that matches the surrounding concrete.
Create a Level Surface
A professional repair is a flat repair. You don’t want to create a new bump or dip in your driveway, which can be a trip hazard and look sloppy. As you apply your filler, use a putty knife or trowel to smooth the material until it’s perfectly flush with the surrounding concrete. You may need to add a little more filler or scrape some away to get it just right. Achieving this level surface is crucial for a lasting, high-quality fix. Professional concrete repair services focus heavily on this step to ensure the structural integrity and appearance of the driveway are fully restored.
Use Self-Leveling Caulk for Flat Areas
If you’re working on a flat, horizontal surface like a driveway or patio, you can make your life a lot easier by choosing the right product. For these areas, “use a gray, self-leveling caulk.” This type of sealant is fantastic for DIYers because it does most of the smoothing work for you. After you apply it to the crack, gravity helps it settle and spread out evenly, creating a perfectly level surface on its own. It’s an incredibly effective way to ensure your repair blends in seamlessly with the existing concrete without a lot of extra troweling and fuss.
Know When to Resurface Instead
Sometimes, a driveway has so many cracks that patching them one by one is no longer practical. If your driveway looks like a spiderweb, individual repairs can look messy and may not address a larger, underlying issue. In this situation, it’s time to consider resurfacing. “This means putting a thin new layer of concrete over the old one.” Resurfacing gives your entire driveway a fresh, uniform appearance and can extend its life for years. A job of this size is complex, so if your driveway is covered in cracks, it’s a good idea to get a free estimate from a professional to understand the best path forward.
Common DIY Mistakes to Avoid
You’ve got your tools, you’re ready to go, but even the most enthusiastic DIYer can make a few common missteps. Avoiding these little mistakes is what separates a temporary patch from a long-lasting repair that looks great. It’s all about working smarter, not harder, to get a result you can be proud of. Think of this as your friendly guide to sidestepping those “wish I’d known that sooner” moments. Getting these details right will save you time, money, and the headache of having to do the job all over again in a few months.
Skipping the Prep Work
This is the most tempting shortcut, and also the biggest mistake. I get it, you want to get to the filling part. But if you apply filler to a dirty, dusty crack, it simply won’t stick. Think of it like painting a wall without cleaning it first; the paint will just peel away. You need to give the filler a clean, solid surface to bond with. Use a hammer and chisel or a wire brush to knock away any loose concrete bits. Then, get all the dust and debris out with a shop vac, leaf blower, or pressure washer. A truly clean crack is the foundation of a successful concrete repair.
Using the Wrong Filler
Walking down the hardware store aisle can be overwhelming, but grabbing the wrong tube of filler will sabotage your project. Concrete fillers are not one-size-fits-all. For flat surfaces like your driveway or patio, you’ll want a self-leveling sealant. It flows into the crack and settles into a smooth, level finish on its own. But if you use that on a sloped or vertical surface, like concrete steps, you’ll have a drippy mess. For those jobs, you need a non-sag polyurethane sealant that’s thick enough to stay put. Using the right product for the job is a simple switch that makes a world of difference.
Overfilling the Crack
More is not better when it comes to concrete filler. It’s natural to want to fill the crack completely, but piling on too much product creates a raised, lumpy bump on your driveway. This not only looks messy but can also be a tripping hazard. The goal is to have the filler sit just flush with the surrounding concrete, or even slightly below it. Apply the filler into the crack, then use a putty knife or even a wet finger to smooth it out. A little extra care at this stage ensures your repair blends in seamlessly instead of sticking out like a sore thumb.
Ignoring the Weather Forecast
Here in the Dallas area, we know the weather can be unpredictable. When it comes to concrete repair, the forecast is your best friend. Most fillers need to be applied in moderate temperatures, typically between 50 and 90 degrees. If it’s too cold, the filler won’t cure properly. If it’s scorching hot, it can dry too quickly and crack. And you definitely want to avoid rain for at least 24 hours. Always check the forecast for a few clear, mild days before you start. A little planning around the weather ensures your repair has the best possible chance to set and harden correctly.
Rushing the Curing Process
You’ve filled the crack, smoothed it out, and you’re ready to call it a day. But the job isn’t done until the filler is fully cured. This is where patience is a true virtue. “Dry to the touch” does not mean it’s ready for pressure. Most products need several days to harden completely. The packaging will give you specific instructions, often listing different times for foot traffic versus vehicle traffic. Driving your car over a patch that isn’t fully cured will squeeze the filler out or create tire impressions, undoing all your hard work. Give it the time it needs.
Forgetting the Backer Rod
Here’s a pro tip that will save you money and lead to a much stronger repair: the backer rod. If you’re working with a crack that’s more than a half-inch deep, don’t just keep pumping filler into the void. That’s a waste of material and can lead to a weak repair. Instead, press a foam backer rod into the crack first, leaving about a half-inch of space at the top for the filler. The rod provides a solid base for the sealant to sit on, ensures the right depth for a proper cure, and prevents the filler from sinking. It’s a simple, inexpensive step that professionals use to get the best results.
Know When to Call a Professional
While filling a small, hairline crack is a great weekend DIY project, some driveway damage is a red flag for bigger issues. Driveway cracks can be stubborn, and most simple patch repairs won’t last forever, especially when the real problem lies beneath the surface. If you see large, deep, or uneven cracks, it’s a sign that you need a professional assessment to understand the root cause. A professional can determine if the issue is with the concrete, the soil underneath, or even your home’s foundation. When in doubt, getting an expert opinion can save you time and frustration. If you suspect a deeper issue, it’s always best to get a free estimate from a trusted pro.
Spotting Signs of a Deeper Problem
How do you know if a crack is more than cosmetic? Look for cracks wider than half an inch or where one side is higher than the other. This unevenness, called heaving, signals that the ground underneath is unstable. If you notice the concrete slabs are moving separately or creating a trip hazard, a simple filler won’t cut it. These are signs that the problem is structural. Attempting a DIY fix on these types of cracks is like putting a bandage on a broken bone. A professional concrete repair service can diagnose the instability and provide a lasting solution.
Connecting Cracks to Foundation or Drainage Issues
Cracks don’t just appear randomly; they often point to a problem with the soil base beneath the slab. Here in the Dallas area, our expansive clay soil swells when wet and shrinks when dry, putting immense pressure on your driveway. If your driveway is cracking, it could be a sign of poor drainage causing the soil to shift. Even a new driveway can crack if the underlying soil problem isn’t addressed. Take a look around. Are your downspouts dumping water right next to the driveway? These could be clues that you have underlying foundation problems that require a comprehensive solution.
How to Prevent Future Cracks
Whether you’ve just completed a repair or your driveway is still in great shape, a little prevention goes a long way. Taking a few proactive steps can help protect your concrete and extend its life.
Seal your driveway every few years
Sealing your driveway is one of the best ways to prevent cracks. A quality sealant keeps water from seeping into the concrete, which stops small cracks from getting bigger and prevents damage from the freeze-thaw cycle. Think of it as sunscreen for your driveway, protecting it from water, oil, and sun damage.
Ensure proper drainage
Water is concrete’s number one enemy. Make sure your yard is graded so that water flows away from your driveway and foundation. Keep your gutters clean and extend your downspouts to direct water far from your home. If you notice water pooling on or near your driveway after it rains, you may have a drainage issue that needs a professional look.
Avoid heavy loads on the edges
The edges of your driveway are its most vulnerable points. Try to avoid driving heavy vehicles, like moving trucks or RVs, on the outer foot of your driveway slab. The weight can cause the edges to crack and crumble over time. When you have large deliveries, just let the driver know to keep their truck off the edges if possible.
Related Articles
- How to Fill Large Cracks in Concrete Like a Pro
- Concrete Repair – Solid Base
- Ultimate Guide to Foundation Repair Options
Frequently Asked Questions
How do I know if a crack is a simple DIY fix or a sign of a bigger problem? A good rule of thumb is to look at the crack’s size and position. If it’s a hairline crack less than a half-inch wide and the concrete on both sides is level, it’s usually a great candidate for a DIY repair. However, if the crack is wider than a half-inch, or if one side is higher than the other, it often points to an unstable ground issue. These types of structural problems require a professional diagnosis to find a lasting solution.
My repair patch is a different color than my driveway. Is there anything I can do? This is a very common issue because new concrete patches are always a different shade than older, weathered concrete. For future repairs, you can test the filler in a hidden spot to see how it dries. For a patch that’s already cured, the best way to create a more uniform look is to wait a month or so and then apply a quality concrete sealer over the entire driveway. This will even out the tone and protect your whole driveway at the same time.
What is the most important step in the repair process? Without a doubt, the most critical step is cleaning the crack before you fill it. It might seem tedious, but any dirt, dust, or loose debris left inside will prevent the filler from creating a strong bond with the concrete. A repair on a dirty surface is guaranteed to fail quickly. Taking the extra time to scrub, vacuum, or blow the crack completely clean is the single best thing you can do to ensure your hard work lasts.
Can I just use one type of filler for all the different cracks? It’s best to match the product to the specific crack. For very small hairline cracks, a flexible caulk is perfect. For slightly wider cracks, you’ll want a sand-based patching compound that has more body. The location also matters; a self-leveling sealant is great for flat driveways because it smooths itself, but it will create a mess on a sloped surface. Using the right product for the job ensures the repair is both effective and looks clean.
How often should I seal my driveway to help prevent new cracks? For driveways here in the Dallas area, sealing your concrete every two to three years is a great preventative measure. Our intense sun and periods of heavy rain are tough on concrete. A good sealer acts as a protective barrier, stopping water from seeping into the pores of the concrete and causing damage, especially during freeze-thaw cycles. It’s a simple maintenance task that can significantly extend the life of your driveway.