
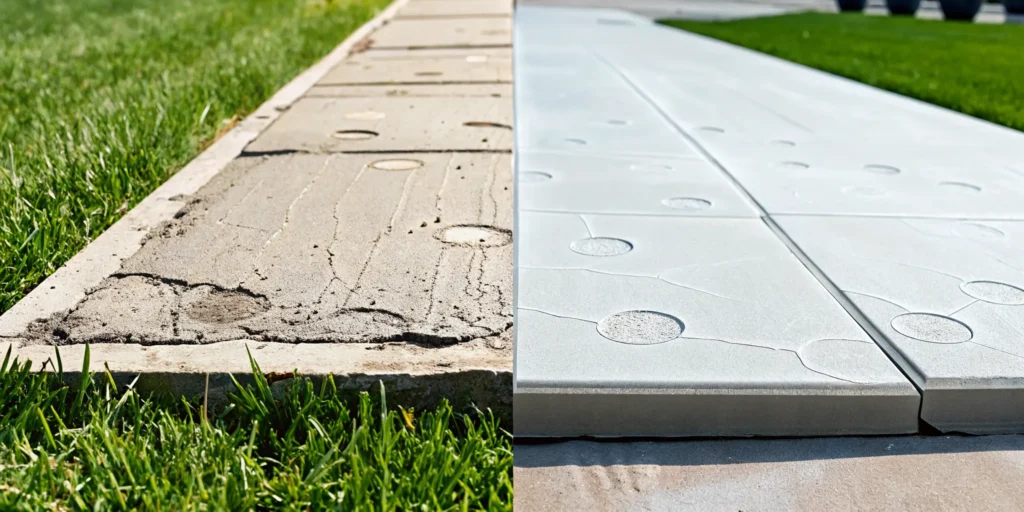
That rough, pockmarked texture on your driveway or the flaky, peeling spots on your patio can be disheartening. You might notice these little imperfections and wonder if they’re just cosmetic or a sign of a bigger problem. These issues, known as pitting and flaking, are your concrete’s way of telling you it’s under stress. While it’s tempting to ignore them, these small openings allow water to seep in, which can lead to much larger cracks and damage over time, especially with our Texas weather. Understanding what causes concrete pitting and flaking is the first step toward finding a real solution that protects your property’s value and safety.
Key Takeaways
- Look Beyond the Surface Damage: Pitting and flaking are more than just cosmetic issues; they are symptoms of deeper problems. This damage is often caused by water intrusion, the freeze-thaw cycle, harsh deicing chemicals, or even a poor initial installation.
- Prioritize Proactive Maintenance: You can prevent most concrete damage with a few simple habits. Regularly apply a quality sealer to block moisture, ensure your yard has proper drainage to keep water from pooling, and use sand for traction instead of corrosive deicing salts.
- Distinguish DIY Fixes from Professional Repairs: While you can patch minor, shallow pits yourself, widespread flaking or long, deep cracks signal a more serious issue. These problems require a professional assessment to fix the root cause, not just the surface-level symptom.
What Are Concrete Pitting and Flaking?
If you’ve noticed your concrete driveway, patio, or garage floor looking a little rough, you might be seeing pitting or flaking. These are two common signs that the surface of your concrete is starting to break down. While they might seem like minor cosmetic issues at first, they can point to bigger problems and will get worse if you ignore them. Understanding what you’re looking at is the first step toward a solution that keeps your property safe and looking its best.
Pitting looks like a collection of small, shallow holes, almost like the concrete has a case of acne. These pockmarks often appear in clusters, making the surface feel bumpy and uneven. Flaking, which is also called spalling, is when the top layer of your concrete starts to peel or chip away. You might see thin, flat pieces of concrete breaking loose, exposing the rougher, more porous material underneath. Both are signals that your concrete is under stress from things like water, weather, or even a poor initial installation. Addressing these issues early with professional concrete repair can prevent a small problem from turning into a large, expensive one that requires a full replacement.
How to Spot Concrete Pitting
Pitting is one of those problems that can sneak up on you. It might not appear for months or even years after your concrete is poured. You’ll want to look for small, crater-like holes on the surface. Often, these pits don’t appear alone; they show up in clusters, giving the concrete a pockmarked and coarse texture. Run your hand over your driveway or walkway (carefully!). If it feels rough and bumpy instead of smooth, you’re likely feeling the effects of pitting. It’s especially common in areas where water might pool or where deicing salts are used during our occasional Texas ice storms.
How to Spot Concrete Flaking (Spalling)
Concrete flaking, or spalling, is usually more obvious than pitting. It looks like the surface is peeling. You’ll see thin layers of concrete chipping off, almost like a sunburned skin. This exposes the weaker, more porous concrete underneath and can leave your driveway or patio looking patchy and worn out. You might find loose, flaky pieces of concrete on the ground after sweeping. Spalling creates an uneven surface that can be a trip hazard, and it’s a clear sign that the top layer of your concrete has lost its strength and is breaking apart.
Why This Damage Gets Worse Over Time
It’s easy to dismiss a few pits or flakes, but these small openings are invitations for bigger trouble. Once the protective top layer of your concrete is compromised, it’s an open door for moisture. Water seeps into these tiny holes and cracks. In colder weather, that trapped water freezes and expands, which breaks the concrete apart from the inside out. This freeze-thaw cycle turns small pits into larger holes and minor flakes into widespread spalling. Over time, this continuous deterioration can lead to deep cracks and even compromise the structural integrity of the slab, making repairs more complex and costly.
What Causes Concrete to Pit and Flake?
When you notice those little pits and flakes on your driveway or patio, it’s easy to feel frustrated. What went wrong? Usually, it’s not just one single thing but a combination of factors that causes concrete to break down. Think of it like a puzzle; the initial concrete mix, the way it was installed, and what it’s been exposed to over the years all fit together to create the final picture.
The problem often starts long before you ever see the damage. It could be rooted in a subpar concrete mix or an installation job that was rushed on a blazing hot Texas day. From there, everyday life and weather take their toll. Water is a major culprit, especially when it freezes and thaws. The chemicals we use to melt ice can also be surprisingly harsh on concrete surfaces. Sometimes, the problem is even deeper, originating from the steel reinforcement hidden inside the slab. Understanding these potential causes is the first step toward finding a lasting fix. By figuring out the “why” behind the damage, you can choose the right concrete repair method and prevent it from happening again.
A Poor-Quality Concrete Mix
It all starts with the ingredients. Just like a cake recipe, a concrete mix needs the right balance of cement, sand, gravel, and water to be strong and durable. If the mix was low-quality from the start, with too much water or not enough cement paste to bind everything together, the resulting slab will be weak. This initial weakness makes the concrete porous and much more likely to pit and flake under normal wear and tear. It simply doesn’t have the structural integrity to stand up to the elements or daily use, making surface damage almost inevitable down the road.
Improper Curing and Installation
The way concrete is installed and finished is just as important as the mix itself. The curing process, where concrete hardens and gains its strength, is critical. If it dries out too quickly, especially under the hot sun or in windy conditions, it won’t cure properly and will have a weak, brittle surface. Poor finishing techniques can also trap water or create a fragile top layer. Pouring concrete in extreme temperatures, whether too hot or too cold, can also compromise its final strength. A rushed or inexperienced installation can set your concrete up for failure before it’s even fully hardened.
The Freeze-Thaw Cycle
Even in the Dallas area, we get enough freezing nights to cause problems for concrete. Here’s how it works: water from rain or sprinklers seeps into the tiny pores of your concrete. When the temperature drops below freezing, that trapped water turns to ice and expands. This expansion puts immense pressure on the concrete from the inside. As temperatures rise, the ice thaws, and the cycle repeats. Each time this happens, it weakens the surface and can pop off small pieces, creating the pitting and flaking you see. Over several seasons, this repeated stress can cause significant damage.
Harsh Deicing Salts and Chemicals
When an ice storm hits, reaching for deicing salts seems like the obvious solution. Unfortunately, many common deicers are incredibly corrosive to concrete. These chemicals, particularly those containing chlorides, can seep into the concrete along with melting ice and water. They not only accelerate the damaging freeze-thaw cycle but also cause chemical reactions that break down the cement paste holding the slab together. This leads to a weaker surface that is much more prone to spalling and pitting. While keeping your walkways safe is important, it’s wise to be mindful of what you’re putting on your concrete.
Corroding Rebar
Many concrete slabs, like driveways and foundations, contain steel reinforcement bars, or rebar, for added strength. While the concrete is supposed to protect this steel, cracks can allow water and oxygen to seep in and reach the rebar. When this happens, the steel begins to rust. Rusting steel expands to several times its original volume, creating immense internal pressure that pushes the surrounding concrete outward. This force is powerful enough to break off large chunks and flakes from the surface, a problem known as spalling. Corroding rebar is a serious issue that compromises the structural integrity of the concrete.
Surface Stains from Oil and Grease
While an oil stain on the garage floor might seem like just a cosmetic issue, it can contribute to long-term damage. Oil, grease, and other automotive fluids are penetrative. They can soak into the pores of the concrete and slowly break down the cement paste that binds the aggregates together. This weakens the surface layer, making it softer and more susceptible to pitting and flaking from regular foot or vehicle traffic. Cleaning up spills as soon as they happen is a simple but effective way to protect your concrete from this type of gradual deterioration and keep it looking its best.
How Your Environment Wears Down Concrete
You might think of concrete as being as tough as, well, rock. But even the strongest concrete surfaces are vulnerable to their surroundings. Here in the Dallas area, our unique climate can be particularly tough on driveways, patios, and foundations. The intense summer heat, sudden downpours, and dry, windy days all play a role in the slow breakdown of your concrete. Over time, these environmental stressors can cause the surface to pit, flake, and crumble. Understanding how the local weather affects your concrete is the first step in protecting your investment and knowing when it’s time to consider a professional concrete repair. Let’s look at a few key environmental factors that contribute to this wear and tear.
Extreme Heat and Temperature Swings
We all know how brutal a Texas summer can be, and your concrete feels it, too. If concrete is poured on a very hot day, the surface can dry out too quickly. This rapid curing process doesn’t give the material enough time to gain its full strength, leaving it with a weaker top layer that’s prone to future pitting and flaking. Even after it’s fully cured, concrete is constantly reacting to temperature changes. It expands slightly in the heat and contracts in the cold. Over years of hot days and cool nights, this constant movement creates stress that can lead to surface damage and cracks.
Poor Drainage and Standing Water
Water is one of the most persistent enemies of concrete. When your property has poor drainage, rainwater can pool on your driveway, patio, or against your home’s slab. This standing water slowly seeps into the pores of the concrete. Over time, the constant moisture can weaken the cement paste that binds everything together, causing the surface to become soft and crumbly. This is especially dangerous when water collects near your home, as it can compromise the integrity of your entire foundation. That’s why ensuring gutters are clear and your yard is properly graded away from concrete surfaces is so important for its long-term health.
Dry, Windy Conditions
Just as extreme heat can be a problem, so can intensely dry and windy weather, especially during installation. When strong, dry winds blow across the surface of freshly poured concrete, it can cause the moisture to evaporate too quickly. This process, known as drying shrinkage, can create tiny surface cracks. While they may seem insignificant at first, these small cracks can trap water and debris. Over time, they can expand and grow, eventually leading to larger sections of flaking and pitting. It highlights how crucial professional installation is, as an experienced team knows how to manage these environmental challenges to ensure a durable, long-lasting finish.
Your Step-by-Step Guide to Repairing Concrete
If you’ve noticed some minor pitting or flaking on your driveway or patio, you might be tempted to tackle the repair yourself. For small, cosmetic issues, a DIY approach can work. This guide will walk you through the basic steps for a simple patch job. However, it’s important to recognize when a problem is more than skin deep. Widespread damage, deep cracks, or uneven surfaces often point to a bigger issue with the concrete slab or the foundation beneath it. If you suspect the problem goes beyond a simple surface fix, it’s always best to get a professional opinion before you begin.
Step 1: Assess the Damage
First, take a close look at the concrete. Are you dealing with a few small, shallow pits, or is the surface flaking and chipping away in large patches? This flaking, also known as spalling, often happens when water gets into the concrete and freezes, or when the surface is exposed to deicing salts. Understanding the extent of the damage will help you decide if this is a small project you can handle or if it requires a more robust concrete repair solution. Make a note of how deep the pits are and how large the affected area is.
Step 2: Clean the Area Thoroughly
Before you can apply any repair material, the surface needs to be completely clean. Start by using a wire brush or chisel to remove any loose, crumbling concrete. From there, you’ll need to get rid of any dirt, oil, or grime. A pressure washer is great for this, but a stiff scrub brush, water, and a concrete cleaner can also do the trick. A clean, slightly porous surface is essential for ensuring the new patching material will bond properly and create a lasting repair. Let the area dry completely before moving on to the next step.
Step 3: Patch Any Minor Pits
If you’re only dealing with a few isolated and shallow pits, a concrete patching compound is your best friend. These products are designed specifically for filling in small holes and cracks. Following the manufacturer’s instructions, mix the compound and apply it to the pitted areas with a trowel. Press the material firmly into the pits to remove any air pockets and smooth the surface so it’s level with the surrounding concrete. For a textured finish that matches the rest of your slab, you can gently sweep a broom over the patch before it fully cures.
Step 4: Resurface Heavily Damaged Sections
When you have a larger area with widespread but shallow pitting, patching each spot individually isn’t practical. In this case, a concrete resurfacer is a better option. This product is a cement-based coating that you apply over the entire damaged section to create a brand-new surface. After cleaning the area, you’ll mix the resurfacing product and spread it evenly with a squeegee. This process gives the concrete a fresh, uniform finish, effectively covering up all the minor imperfections at once. It’s a bigger job than patching, so be sure to read the instructions carefully.
Step 5: Apply a Protective Sealer
Once your patch or resurfacing job has fully cured (which can take a day or more), it’s time to protect your work. Applying a high-quality concrete sealer is a crucial step that many people skip. A good sealer acts as a barrier, protecting the concrete from water penetration, chemicals, and the damaging effects of freeze-thaw cycles. This simple step can dramatically extend the life of your concrete and prevent future pitting and flaking. Plan on reapplying the sealer every few years to keep your concrete looking its best.
Step 6: Know When to Call a Professional
While DIY repairs can handle minor cosmetic issues, some problems are clear signs of a deeper issue. If the pitting is widespread and deep, or if you see long, spiderwebbing cracks, it’s time to call in an expert. These can be symptoms of a failing concrete slab or even an unstable foundation. Trying to patch a significant structural problem will only waste your time and money. If you’re unsure about the severity of the damage, it’s always best to be safe. You can contact us for a free estimate, and we’ll help you figure out the right solution.
How to Prevent Concrete Pitting and Flaking
While it’s good to know how to fix pitted or flaking concrete, preventing the damage in the first place is always the best approach. A little proactive care can save you a lot of time, money, and frustration down the road. Think of it as simple, routine maintenance for one of your home’s biggest assets. By taking a few key steps, you can protect your driveway, patio, and walkways, keeping them strong and looking great for years to come. These preventative measures are your first line of defense against the wear and tear that can lead to serious concrete problems.
Start with a High-Quality Concrete Mix
The long-term strength of your concrete starts with its ingredients. A proper concrete mix needs a balanced recipe of cement, sand, gravel, and water. If there’s too much water, the resulting concrete will be weaker and more porous, making it vulnerable to pitting and flaking later on. While you might not be mixing the concrete yourself, it’s important to know that a lower water-to-cement ratio creates a denser, more durable surface. When you hire professionals for a new installation, you can feel confident they are using a high-quality mix designed for longevity.
Cure New Concrete Correctly
Pouring concrete is just the beginning; the curing process that follows is what truly gives it strength. Curing isn’t just about drying out. It’s a chemical reaction where the concrete hardens and strengthens over time. To cure properly, new concrete needs to stay moist for at least a week. Professionals achieve this by periodically spraying the surface with a fine water mist or by applying a liquid curing compound that locks in moisture. Rushing this step or letting the concrete dry out too quickly can lead to a weak surface that’s prone to damage.
Seal Your Concrete Regularly
Think of a concrete sealer as a protective jacket for your driveway or patio. A good quality sealer shields the surface from water, oil, deicing salts, and other chemicals that can seep in and cause damage. It’s especially important for preventing the destructive freeze-thaw cycle we see during Texas winters. For the best protection, concrete should be sealed after it’s fully cured and then resealed every few years as part of your regular home maintenance. This simple step is one of the most effective ways to prevent pitting and flaking and extend the life of your concrete surfaces. If you need help with concrete repair and sealing, our team can get it done right.
Maintain Proper Drainage
Water is the number one enemy of concrete and your home’s foundation. When water pools on your concrete surfaces or collects around your foundation, it can lead to a host of problems, including pitting, flaking, and settling. The goal is to direct water away from your home. Make sure your gutter downspouts extend several feet from the foundation and that the ground slopes away from your house. In some cases, a French drain or other drainage solutions might be needed to handle excess water. Proper drainage is essential for protecting both your concrete and your foundation.
Be Smart About Deicing Salts
When a Dallas ice storm hits, it’s tempting to grab the nearest bag of deicing salt. However, many common deicers, especially those containing sodium chloride (rock salt), are highly corrosive and can eat away at your concrete’s surface, causing pits and flakes. For the first winter after new concrete is poured, it’s best to avoid deicers altogether. Instead, use sand for traction. If you must use a chemical deicer, look for products specifically labeled as safe for concrete, which often contain calcium magnesium acetate. A little caution during icy weather can prevent a lot of damage.
Inspect Your Concrete and Repair Cracks Early
Take a walk around your property a few times a year and give your concrete a quick look. Catching small cracks early can prevent them from turning into big problems. A tiny crack is an open invitation for water to get in, freeze, expand, and break the concrete apart from the inside. You can fill minor hairline cracks with a concrete caulk or sealant to stop water in its tracks. If you spot wider cracks, significant flaking, or areas that seem to be sinking, it’s a sign of a deeper issue. That’s the perfect time to contact us for a free, no-obligation estimate.
Related Articles
- How to Fill Large Cracks in Concrete Like a Pro
- Concrete Repair – Solid Base
- Foundation Crack Repair: A DIY vs. Pro Guide
- Ultimate Guide to Foundation Repair Options
- A Homeowner’s Guide to Foundation Repair Services
Frequently Asked Questions
Is pitting or flaking a sign of a serious problem? It can be. While a few small pits might just be a cosmetic issue, they often act as an early warning sign. These openings allow water to get inside the concrete, which can lead to more significant damage like deep cracks or widespread flaking, especially after freezing weather. If the damage is near your home’s foundation or is accompanied by sinking or large cracks, it could point to a more serious structural issue that needs a professional look.
My concrete is only a few years old. Why is it already damaged? This is a common and frustrating situation. Often, the problem starts long before you see any damage. It could be that the original concrete mix had too much water, or it may have been installed on a very hot day, causing it to dry too quickly and cure improperly. Even new concrete is vulnerable to our local weather, particularly the freeze-thaw cycle, which can cause surface damage in just a few seasons.
Can I just patch the bad spots, or do I need to replace the whole driveway? You have several options before considering a full replacement. Small, isolated pits can often be fixed with a simple patching compound. If you have a larger area with shallow, widespread damage, a concrete resurfacer can provide a fresh, new top layer. Replacement is usually a last resort for slabs that are structurally compromised. A professional can assess the damage and help you find the most effective and economical solution for your specific situation.
What’s the single most effective way to protect my concrete from future damage? Applying a high-quality sealer is the best thing you can do. Think of it as a protective shield. A good sealer prevents water, deicing salts, and oil from soaking into the concrete’s pores. This protection is your best defense against the internal damage caused by freezing and thawing. Sealing your concrete every few years is a simple maintenance step that can dramatically extend its life and prevent future pitting and flaking.
How do I know if the damage is just cosmetic or if it’s a structural issue? Look for a few key signs. Cosmetic issues are typically shallow and limited to small areas. You might be facing a structural problem if you see deep, wide cracks (especially ones that are growing), if sections of the concrete are sinking or heaving, or if the slab feels uneven and spongy when you walk on it. If you notice any of these issues, it’s best to stop any DIY plans and get a professional opinion.