That wobbly patio table and the puddle that never seems to dry are clear signs your patio is sinking. As a homeowner, you’re now faced with a decision: do you attempt a DIY patch, hire a professional, or consider a full replacement? The answer often comes down to your budget. Knowing the typical sunken patio repair cost helps you weigh your options realistically. While a quick fix might seem cheaper upfront, investing in a professional solution that addresses the root cause offers better long-term value. This article will explore the costs involved so you can see how an expert repair protects your property and your peace of mind.
Key Takeaways
- Water and soil are the primary culprits: Most sinking patios are a result of poor drainage eroding the base or expansive clay soil shrinking and swelling. Identifying and fixing these core issues is the only way to achieve a permanent repair.
- Lifting is often better than replacing: For a structurally sound but sunken slab, repair methods like PolyLevel® foam injection can restore your patio to its original position. This is a cost-effective and minimally invasive alternative to a full replacement.
- A solid base is your best defense: Whether repairing or replacing, the long-term stability of your patio depends on a properly compacted base that allows for drainage. Investing in a professional repair ensures this critical foundation is built correctly, preventing future sinking.
Why Do Patios Sink?
It’s frustrating to see your once-perfect patio start to dip and sink. You might think it’s just a cosmetic issue, but a sinking patio is often a red flag for bigger problems happening beneath the surface. Understanding why your patio is sinking is the first step toward finding a lasting solution. Most of the time, the cause comes down to one of three culprits: water, a weak base, or the soil itself. Let’s look at each of these so you can get a better idea of what’s happening in your backyard.
Drainage and Water Problems
Water is the biggest threat to a stable patio. When your yard doesn’t have proper drainage, rainwater has nowhere to go but down, pooling around and under your patio slab. This constant flow of water can slowly wash away the soil and base materials that support the concrete. A patio that sinks in specific spots often points to a drainage problem that wasn’t fixed before it was built.
Over time, this erosion creates voids under the slab, causing it to settle and crack. If you see water pooling or downspouts dumping water right next to your patio, it’s a clear sign that you need to address the drainage before starting any concrete repair. Without fixing the root cause, any repairs will only be a temporary fix.
A Poorly Prepared Base
A patio is only as strong as the foundation it’s built on. The number one reason patios sink is a poorly prepared base. Before pavers or concrete are ever laid, the ground underneath needs to be properly compacted and graded. A solid base consists of a thick layer of compacted gravel or sand that provides stability and allows for drainage. If the original contractor cut corners by not compacting the soil enough or using too little base material, the ground will inevitably settle under the weight of the patio. This creates an unstable surface that will sink, shift, and become uneven over time.
Soil Erosion and Settling
The type of soil in your yard plays a huge role in your patio’s stability. Here in the Dallas area, we have a lot of expansive clay soil. This type of soil acts like a sponge; it swells up when it gets wet and shrinks dramatically when it dries out. This constant cycle of expansion and contraction puts immense pressure on your patio slab.
As the soil shrinks during dry spells, it pulls away from the concrete, creating empty pockets. The slab then sinks into these voids, leading to uneven surfaces and cracks. This is the same process that can cause serious foundation problems for your home, making it critical to address soil-related issues with a professional solution.
Spotting the Warning Signs of a Sunken Patio
Your patio should be a place for relaxation, not a source of stress. But over time, you might notice subtle changes that point to a bigger problem lurking beneath the surface. A sinking patio often starts with small, easy-to-miss signs. Catching these issues early is the key to a simpler, less expensive fix. By knowing what to look for, you can address the root cause before it leads to major structural damage or safety concerns. Let’s walk through the three most common red flags that tell you your patio is sinking.
Cracks and Surface Damage
One of the first things you’ll likely notice is cracks appearing on your patio’s surface. These can start as small, hairline fractures but can grow into wider gaps. You might also see chipping or flaking, a problem known as spalling. While a tiny crack might not seem like a big deal, it’s often a symptom of instability in the soil below. Water seeps into these cracks, washing away more soil and making the problem worse. Addressing concrete repair early on stops this cycle, preventing minor flaws from becoming major headaches.
Uneven Surfaces and Puddles
Does water pool on your patio long after the rain stops? This is a classic sign of a sinking slab. A properly installed patio is graded to allow water to run off, so standing water means something has shifted. You might also feel it when you walk across the surface; one area may feel lower than another, or your patio furniture might wobble. These uneven surfaces indicate that the soil base is no longer providing adequate support. This is especially common in the Dallas area, where expansive clay soils can lead to unstable foundation conditions.
Trip Hazards and Safety Issues
An uneven patio isn’t just an eyesore; it’s a serious safety risk. A raised concrete edge of even half an inch can easily catch a foot and cause a nasty fall. This creates a hazard for your family, especially kids and older relatives, as well as any guests you have over. As a homeowner, you could be responsible if someone gets hurt. Regularly walking your patio to check for uneven joints is a simple way to stay ahead of potential accidents. Seeing how professionals have corrected these issues can give you a clear idea of what a safe surface looks like, like in our gallery of past projects.
How to Fix a Sunken Patio: Common Repair Methods
Once you’ve identified a sinking patio, the next step is figuring out the best way to fix it. The right solution depends on your patio’s material (like a concrete slab or pavers) and what’s causing the problem in the first place. Some methods lift the existing structure back into place, while others involve rebuilding the foundation from scratch. Understanding your options will help you have a more productive conversation with a contractor and choose a repair that lasts.
Professional concrete repair can restore your patio’s safety and appearance without the high cost and hassle of a complete replacement. Below are some of the most common and effective methods for lifting and leveling a sunken patio, from modern foam injections to traditional base repairs. Each approach has its own benefits, and a professional can help you determine which is the best fit for your home.
Mudjacking vs. Slab Jacking
If you have a sunken concrete patio, mudjacking and slab jacking are two popular methods for lifting it. Mudjacking is the more traditional technique. It involves pumping a slurry, a mixture of cement, soil, and other materials, through holes drilled in the concrete. This mixture fills the voids underneath and hydraulically lifts the slab back into position. It’s a proven method that works well for larger areas.
Slab jacking is a more modern alternative that uses high-density polyurethane foam instead of a slurry. The process is similar: a contractor drills small holes and injects the foam, which expands to lift the concrete. This method is generally quicker, the holes are smaller, and the patio is often ready for use almost immediately after the repair is complete.
PolyLevel® Foam Injection
PolyLevel® is a specific type of slab jacking that uses a high-tech, structural-grade polymer foam. This method is a go-to for many modern foundation repair experts because it’s incredibly precise and minimally invasive. The lightweight foam is strong enough to support the slab but won’t add significant weight to the already unstable soil underneath, which helps prevent future settling.
The process is clean and efficient. Small, dime-sized holes are drilled into the sunken slab, and the foam is injected. As it expands, it gently lifts the concrete back to its original level. For homeowners, this means less disruption to your yard and a patio that’s ready for your next barbecue in about 15 minutes.
Re-leveling the Base
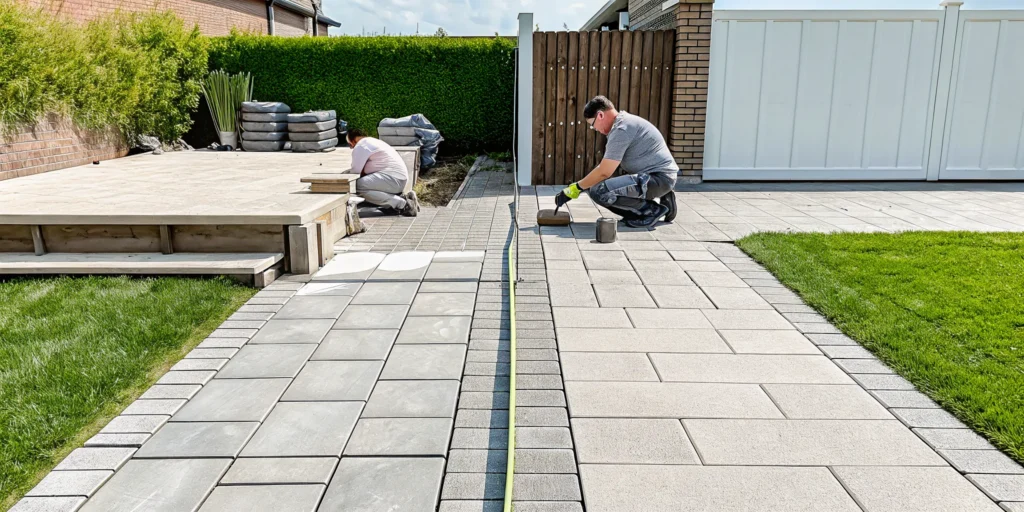
If your patio is made of pavers instead of a solid concrete slab, the problem is almost always a poorly prepared base. In this case, lifting the pavers is the only way to fix the root cause. The repair involves carefully removing the pavers in the sunken area, and often the entire patio, to access the base material below.
From there, a contractor will correct the issue. This usually means adding and compacting a new layer of gravel and sand to create a stable, properly sloped foundation that ensures good drainage. Once the base is solid, the original pavers are put back in place. While it’s more labor-intensive, re-leveling is the correct way to ensure your paver patio remains even for years to come.
Resurfacing and Overlays
Sometimes, a patio might be structurally sound but look worn out with surface cracks, spalling, or discoloration. In these situations, resurfacing can be a great option. This method involves applying a thin cement-based overlay to the existing concrete, giving it a fresh, new surface without having to tear anything out. It’s a cosmetic fix, not a structural one.
Resurfacing is only suitable when the patio is stable and not actively sinking. If you have minor surface damage, an overlay can completely transform the look of your patio for a fraction of the cost of replacement. You can even add colors and textures to get a custom, high-end finished look.
How Much Does Sunken Patio Repair Cost?
Figuring out the budget for a sunken patio repair can feel a bit like a puzzle, but it’s more straightforward than you might think. For most homeowners, the cost to level a sunken patio typically falls between $750 and $2,500. The final price tag depends on a few key things: the size of your patio, the extent of the sinking, and the repair method you choose. A small, 75-square-foot section might be on the lower end of that range, while a larger 100-square-foot area with more significant issues will naturally cost more.
Think of it this way: a minor dip that needs a quick lift is a much different project than a large, severely sloped patio that requires extensive work. The goal is to find a solution that not only fixes the problem but also prevents it from happening again. While it’s tempting to look for the cheapest fix, investing in a quality repair from a trusted professional can save you money and headaches down the road. We’ll break down the costs so you can get a clearer picture of what to expect for your specific situation.
Comparing Costs by Repair Method
The technique used to lift your patio is one of the biggest factors in your final bill. Traditional mudjacking, which involves pumping a slurry of cement, soil, and water under the slab, is a common option. However, a more modern and durable solution is polyurethane foam injection, often called PolyLevel®. This method uses a high-density foam that expands to lift the concrete. While PolyLevel® can sometimes have a higher initial cost, ranging from $800 to $1,500 or more for a project, it’s lightweight, cures quickly, and is far less invasive. This makes it a cost-effective alternative to a full slab replacement, which is the most expensive option. The right concrete repair method for you will balance your budget with long-term stability.
How Patio Size Affects the Price
It’s a simple rule: the bigger the patio, the more the repair will cost. This is because larger areas require more materials and more time to fix. For example, leveling a small 100-square-foot section might average around $1,600, but that price can climb if the entire patio has sunk or if multiple slabs need to be lifted. When a contractor gives you an estimate, they are calculating how much lifting material is needed and how many injection points are required to create a stable, even surface. That’s why a detailed inspection is so important; it allows a professional to accurately measure the area and determine the scope of the work.
Breaking Down Material and Labor Costs
Your repair quote will be a combination of two main things: materials and labor. Professional labor rates typically range from $50 to $150 per hour, and you’re paying for expertise. An experienced technician knows exactly where to inject the lifting material to get a precise, even result without cracking the slab. Material costs vary depending on the method. The polyurethane foam used in PolyLevel® is a specialized product, and its cost will be factored into the overall project price. Many companies offer flexible financing options to help make the project more manageable, so you don’t have to delay an important repair due to budget concerns.
What Factors Influence Your Repair Bill?
When you get a quote for patio repair, the final number isn’t pulled out of thin air. Several key elements combine to determine the total cost of bringing your outdoor space back to life. Understanding these factors will help you read your estimate with confidence and see exactly where your money is going. The three biggest variables are the extent of the existing damage, the size and material of your patio, and how accessible your property is for the repair crew.
Each of these plays a significant role in the tools, time, and techniques required for the job. A small, straightforward fix will look very different from a large, complex project that requires extensive work. By breaking down what influences the price, you can get a clearer picture of the investment needed to restore your patio’s safety and appearance. It also helps you appreciate why a thorough inspection is the necessary first step before any work begins.
The Severity of the Damage
The most direct influence on your repair bill is how much damage your patio has sustained. A few hairline cracks are a much simpler and less expensive fix than a patio that has large gaps, is severely uneven, or has crumbling corners. The longer you wait to address a problem, the worse it tends to get. A small dip that could be fixed with a quick injection might turn into a major sunken section that requires more intensive lifting and stabilization.
Putting off a small concrete repair can lead to bigger issues down the road, including safety hazards from tripping. What might be a relatively minor expense today could evolve into a much larger project costing thousands if the underlying problem is left to worsen over time.
Your Patio’s Material and Size
It makes sense that a larger patio will cost more to repair than a smaller one, simply because it requires more material and more time to fix. A 100-square-foot area will naturally demand more resources than a 50-square-foot one. The material your patio is made from also plays a big part. Repairing a poured concrete slab involves different techniques and costs compared to re-leveling individual pavers or stones.
Some materials are more labor-intensive to work with, which can affect the final price. You can see examples of different patio types we’ve restored by looking at our work. During an inspection, a professional will assess both the size and material to determine the best repair method and calculate an accurate cost.
Property Access and Location
Where your patio is located on your property can also affect the price. If your backyard is hard to reach with specialized equipment, it might require more manual labor or different tools, which can add to the overall time and cost of the project. Obstacles like narrow gates, steep slopes, or delicate landscaping can make the job more complex for the repair crew.
Your geographic location is another factor, as labor and material costs can vary from one area to another. While Solid Base serves the greater Dallas region, specific site conditions are always considered. You can see the communities we work in by checking our service area. An easily accessible patio in an open yard is typically the most straightforward and cost-effective scenario for repairs.
Should You Repair or Replace Your Patio?
Deciding whether to patch up your patio or start fresh can feel like a huge decision. On one hand, a repair seems faster and cheaper. On the other, you don’t want to throw money at a problem that will just come back. The right choice depends on the extent of the damage, your patio’s age, and your long-term goals for your outdoor space. By looking at a few key factors, you can figure out the most practical and cost-effective path forward for your home.
When Repair Is the Smart Choice
A repair is often the best route if your patio’s issues are relatively minor and isolated. If the damage covers less than a quarter of the surface and the patio is under 15 years old, a targeted fix makes a lot of sense. This is especially true for surface-level problems like a few small cracks, minor sinking in one spot, or stains. A professional concrete repair can often be completed in just a few days, letting you get back to enjoying your yard quickly. Opting for a repair in these situations saves you significant money and disruption compared to a full-blown replacement.
Signs It’s Time for a Full Replacement
Sometimes, a repair is just a temporary fix for a much deeper issue. If you find yourself fixing the same cracks or uneven spots over and over, it’s a strong sign that the underlying foundation is failing. Patios over 20 years old, especially those with widespread cracks, severe sinking, or major drainage problems, are prime candidates for replacement. These issues often point to a base that wasn’t properly prepared or has eroded over time. Delaying a necessary replacement can lead to more extensive damage and create serious trip hazards, turning your patio into a liability.
Considering Long-Term Value
When you’re weighing your options, think beyond the immediate price tag. While a quick patch-up might be the cheapest solution today, it can cost you more down the road if it fails. A professionally installed patio is an investment that can last for decades. Choosing the lowest bid might be tempting, but contractors who cut corners on preparing the base will leave you with a patio that’s likely to sink and crack again. It’s always more expensive to fix a poorly done job than it is to do it right the first time. Looking at examples of our work can show you what a quality, long-lasting result looks like.
DIY vs. Professional Repair: What’s the Real Cost?
When you see a sunken patio, it’s tempting to think, “I can fix that myself.” The idea of saving money by rolling up your sleeves is appealing, but it’s important to look at the whole picture. The upfront cost of a professional repair might seem high, but a DIY project has its own set of expenses, both in money and time. Let’s break down the real costs of each approach so you can make a smart decision for your home and your budget.
The Hidden Costs of a DIY Project
The biggest draw of a DIY repair is avoiding labor costs. While you might save some money there, other expenses can quickly add up. You’ll likely need to rent specialized equipment, like a plate compactor, which can cost a significant amount per day. You also have to factor in the cost of materials. More importantly, consider your time. A job that takes a professional crew a day could take you several weekends. If the repair doesn’t hold, you’ll have to do it all over again, and there’s no warranty on your own work. A DIY fix that fails could end up costing more than hiring a pro from the start for a proper concrete repair.
The Value of Hiring a Professional
Hiring a professional is an investment in getting the job done right the first time. Experts come with specialized tools and, more importantly, the experience to diagnose the root cause of the sinking. They ensure the base is properly prepared and that drainage is corrected to prevent future problems. A professional team knows how to handle the materials correctly for a seamless, durable finish. Plus, reputable companies provide a warranty for their work. That peace of mind, knowing your patio is stable and your investment is protected, is one of the biggest benefits of going with a pro. You can see the difference quality work makes in our project gallery.
Tools and Equipment You’ll Need
If you’re set on tackling a very small patch or crack, you’ll need some basic gear: safety glasses, gloves, a trowel, a wire brush, and the right concrete patching compound. However, fixing a sunken slab is a different story. This requires heavy equipment to lift the concrete and specialized materials like polyurethane foam to create a stable new base. Renting and operating this equipment can be complicated and expensive. For anything more than a minor cosmetic fix, your best first step is to get a professional opinion. You can contact us for a free, no-obligation estimate to understand the true scope of your project.
How to Prevent Your Patio from Sinking Again
After you’ve gone through the effort and expense of repairing your sunken patio, the last thing you want is a repeat performance. The good news is that you can take proactive steps to keep your outdoor space level and stable for years to come. Preventing future sinking is all about addressing the root causes, which usually come down to water, maintenance, and the quality of the initial installation. By focusing on these three key areas, you can protect your investment and enjoy a safe, beautiful patio without worrying about it sinking again.
Improve Your Yard’s Drainage
Poor drainage is a primary culprit behind sinking patios. When water pools around or under your patio slab, it saturates and softens the soil, causing it to lose its strength. This leads to settling and sinking over time. Take a look at your yard during the next rainstorm. Does water flow toward your patio? Do your downspouts empty right next to it? Redirecting downspouts, improving the grade of the surrounding soil so it slopes away from the patio, or even installing a French drain can make a huge difference. Managing water effectively is a critical step in protecting all of your home’s concrete surfaces and its foundation.
Perform Regular Maintenance
A little upkeep goes a long way in preventing major patio problems. For paver patios, this means keeping the joints between the stones filled. Over time, rain and wind can wash away the sand that locks your pavers in place. You should inspect the joints annually and re-sand them as needed, using polymeric sand to create a firm, flexible bond that also helps block weeds. For both paver and concrete patios, applying a quality sealant every few years will protect the surface from moisture penetration and cracking. Regular cleaning to remove dirt and debris also prevents grime from working its way into small cracks and making them worse.
Start with a Quality Foundation
If you’re replacing your patio entirely, its long-term stability depends completely on what’s underneath it. The number one reason patios sink is a poorly prepared base. A proper foundation for a patio isn’t just dirt; it’s a multi-layered system designed for strength and drainage. A professional installation involves excavating several inches of soil and replacing it with a compacted layer of gravel, followed by a layer of sand. Each layer must be tightly compacted to create a solid, unmoving base that can support the weight of the patio and resist soil erosion. Skimping on this step is a recipe for future failure, which is why trusting an expert for any concrete repair or installation is so important.
How to Get an Accurate Repair Estimate
Getting a clear and accurate estimate is the first step toward fixing your sunken patio for good. A trustworthy contractor won’t just give you a number; they’ll walk you through what’s wrong, how they plan to fix it, and exactly what you’re paying for. This process isn’t just about getting a price, it’s about finding a partner you can rely on to restore your property’s safety and value.
A professional estimate involves a few key stages. It starts with a thorough on-site inspection to diagnose the root cause of the problem. Next, it’s your turn to ask questions to make sure the contractor is the right fit for your project. Finally, you’ll need to review the quote and timeline to understand the full scope of the work. Taking the time to go through these steps will help you feel confident in your decision and avoid any surprises down the road. When you’re ready, you can always contact us for a free, no-obligation estimate.
What to Expect During an Inspection
A professional inspection is much more than a quick glance at your patio. A true expert will conduct a detailed assessment to understand not just the visible damage, but also the underlying issues causing it. During the inspection, the contractor will carefully examine the extent of the sinking, measure the uneven areas, and look for cracks or surface damage.
They will also investigate potential root causes, like poor drainage or soil erosion around the patio. This is a critical step because simply leveling the patio without addressing the source of the problem will only lead to more issues later. A comprehensive inspection ensures the proposed concrete repair solution is effective and long-lasting, giving you peace of mind that the job will be done right the first time.
Key Questions to Ask Your Contractor
Once the inspection is complete, you’ll have the chance to talk with the contractor. This is your opportunity to vet their experience and make sure you’re comfortable with their approach. Don’t be shy about asking direct questions. Start by asking about their experience with projects similar to yours and if they can provide examples of their past work or references from previous clients.
You should also ask how they specifically plan to address the sinking. A good contractor will explain their proposed method clearly. Other important questions include:
- Are you and your team licensed and insured?
- What kind of warranty do you offer on your materials and labor?
- Who will be my main point of contact during the project?
A professional team will be happy to answer your questions and show you examples of our work to demonstrate their expertise.
Understanding Your Quote and Project Timeline
After the inspection and discussion, you’ll receive a formal quote. A detailed quote is a sign of a professional and transparent company. It should provide a clear breakdown of all costs, including materials, labor, and any additional services needed, like fixing a drainage issue. This helps you see exactly where your money is going.
The quote should also include a projected timeline, so you know how long the repair will take from start to finish. Be sure to ask about any potential factors that could affect the timeline or cost. Finally, clarify the payment schedule and ask if they offer any financing options, as this can make a large project more manageable for your budget. A clear, comprehensive quote leaves no room for confusion and sets the stage for a smooth project.
Related Articles
- How to Fill Large Cracks in Concrete Like a Pro
- Ultimate Guide to Foundation Repair Options
- Pier & Beam Foundation Repair: Signs, Costs & Fixes
- A Homeowner’s Guide to Foundation Repair Services
Frequently Asked Questions
How long does a typical patio repair take? The timeline really depends on the repair method. If we’re using a modern technique like PolyLevel® foam injection to lift a concrete slab, the process is surprisingly fast. The work itself often takes just a few hours, and your patio is usually ready to use about 15 minutes after we’re done. If your patio is made of pavers that need to be re-leveled, the project is more involved and can take a couple of days since we have to rebuild the base.
My patio only has a tiny crack. Should I really be worried? It’s smart to pay attention to even small cracks. Think of a tiny crack as an open door for water. Every time it rains, water seeps into that crack, washing away the soil and base material supporting your patio. Over time, this erosion creates a void, causing the slab to sink and the crack to get bigger. Addressing a small crack now is a simple, preventative fix that can save you from a much larger and more expensive structural repair later on.
Will the repair be obvious, or will it blend in with my existing patio? We know that you want your patio to look great, not like a construction zone. When we use foam injection, the holes we drill are very small, about the size of a dime, and are carefully patched to blend with your existing concrete. If your patio needs resurfacing, we can give it a completely fresh, uniform look. Our goal is always to provide a clean, professional finish that restores both the safety and the beauty of your outdoor space.
Is fixing a sunken patio a permanent solution? A professional repair is designed to be a long-term, durable solution because it addresses the root cause of the problem. A quick, superficial patch might look good for a little while, but if it doesn’t fix the underlying drainage or soil issue, the patio will just sink again. By stabilizing the soil and lifting the concrete correctly, we create a solid foundation that is built to last, protecting your investment for years to come.
What makes polyurethane foam a better choice than traditional mudjacking? While mudjacking is a traditional method, polyurethane foam injection offers several key advantages. The foam is incredibly lightweight, so it lifts the slab without adding extra weight to the already unstable soil beneath it. The injection holes are much smaller and less noticeable. Plus, the foam is waterproof, so it won’t wash away, and it cures in minutes, not days. This makes it a cleaner, faster, and more durable solution for lifting sunken concrete.